
Mastering Instagram for social media influencers and businesses was Part 5 of our speaking engagements that Movie TV Tech Geeks has been doing with Wellness in the Woods about social media. You can read all of our articles on this here along with downloading our books in PDF format so you can read those offline. This section will continue growing so keep checking back.
You can download the PDF book versions of this article right here.
Whatever questions you might have (no matter how big or small), bring them, and if we don’t know the answer, we’ll find it! If you have any questions from these articles, let me know.
Instagram 101 For Personal and Businesses
If you’ve heard that Instagram is dead, don’t buy into that bunk. It’s simply not true. There are over one billion users on Instagram and over half of them login each day. Not only that, but daily users spend 30+ minutes browsing their feed and discovering new influencers and brands to follow.
Even better, four out of every five users follow brand accounts. That means there’s a potential audience of 80 million people just waiting to hear from your business on Instagram.
The good news doesn’t stop there—three out of five users report first discovering a product on this social network. This means that Instagram is great not just for your brand exposure but for selling your products, too!
Another plus is that this is the only social media app where you can still reach a large audience without paying for ads. Not only can you communicate with your followers, you can still do it free, with all of these exciting stats. Let’s dive into how you can get the most of Instagram for your business.
Instagram on Desktop VS on Smart Phone
Instagram exists in two ways. The first is as an app on your smart phone or other mobile device. The second is as a website that can be visited on your desktop. Both versions allow users to follow, unfollow, like, and comment on posts. There are a few key differences you should be aware of when toggling between the two.
First, images display differently. Currently, images on desktop can be viewed at 600px x 600px. However, the feed is much larger, so you can view several images at once, if your monitor is big.
Second, you can’t vote in polls. That may not seem like a big deal but if most of your users are visiting your Instagram Stories on desktop, that means you’re getting skewed results.
Another frustration with Instagram on desktop is that you can’t send or receive private messages. If you want to contact other users, your best bet is to post a photo and tag them or tag someone in the comments.
Perhaps the biggest problem is that you can’t post photos from your computer using Instagram desktop. You need to send the photo to your mobile phone. Open the Instagram app on your smart device and upload the picture that way.
Of course, there are a few workarounds to some of these problems. There’s a Chrome plugin called Desktop for Instagram. Using this, you can browse Instagram as if you were on mobile and use many of the mobile features including image uploading.
Another way to get around this issue is to use a third-party publisher such as Buffer or HootSuite. You connect your Instagram account to these social tools.
Then you can upload your images and send them immediately or schedule them in the future. The only downside is that you must have a business Instagram account enabled. That means if you’ve been putting off this vital task, you’ll need to tackle it right away.
How to Use Instagram to Build a List & Get More Followers
When it comes to Instagram, it helps to have a strategy. Sure, you can post whenever you like and add photos or videos randomly. However, the lack of structure and organization won’t help you grow your business.
You need to develop a plan and you’ll want to work that plan if you hope to see results from your Instagram account. Here’s what to do…
Determine your target.
The first task on your to do list is deciding why you’re on Instagram. Are you looking to connect with influencers? Hoping to grow your email list? Trying to get more followers?
Aim to choose just one or two goals for the next four months. After that, you can stop and re-evaluate. If your goals aren’t working for you or you’re not seeing the results you’d hoped for, you can switch up your efforts then.
Define your audience.
Once you have your goal in mind, think about who you’re trying to reach. Is your product or brand geared toward new mothers between the ages of 20-35? Are your customers young male games in the 18-25 demographic?
The more you know about your ideal customer, the easier it is to stand out in their feed. If you don’t already have a customer avatar filled out for your business, now is the time to do so. If you already have one, dust it off. Is it still current? Does it need to be updated or tweaked based on new information you’ve learned about your community?
Create a goodie for your followers.
Once you know who your audience is, you’ll want to design an offer that’s sure to appeal to them. This item should be related to your services or products in some way.
If you’re a web design agency, then you’ll want to offer a checklist of questions to ask your web designer or ten ways to make sure your website is mobile responsive. Remember, if your opt-in gift isn’t related to your industry, it’s going to confuse your followers. This opens the door for mistakes and frustration, which means that they are more likely to skip the opportunity to become subscribers.
Some brands find that sharing a coupon code or discount works best for getting new subscribers on their list. You may want to experiment with this technique, especially if you’re in the business of selling tangible items such as clothing or makeup.
Create a landing page.
Once you’ve set up your mailing list to deliver your new free goodie, it’s time to make a landing page. If you’re not familiar with them, a landing page is a single page on your website that’s designed to feature your offer (such as an opt-in gift).
There are no sidebars, menus, headers, or links on the landing page. The idea behind this design is that visitors are faced with only two choices: sign up for your free gift or click away to another website. This makes landing pages a great way to convert casual visitors into mailing list subscribers.
Typically, you want your landing page to feature 1-2 paragraphs describing your offer, a few bullet points, which highlight the benefits of the item or offer, and a sign-up box. Don’t make your landing page too long. A section with 100-word paragraph or less will do nicely.
Add your landing page to your bio.
Now that you have a dedicated page for your offer, put that link in your bio. This is the only place on Instagram that you’ll be allowed to place your link. So, make sure it’s the page where you really want to direct traffic.
Some brands use a service called LinkTree that creates a page with multiple links for you. This appears useful at first—you can link to your shopping cart, your free offer, and your website all at once.
However, the myriad of choices may overwhelm your followers and they won’t act. It’s smarter to link to a single opt-in page if you’re serious about growing your email list.
Design visual content.
Now that you have all of the pieces set up in place, you can begin promoting your new offer on Instagram. A simple way to do that is to design 3-5 images that tease subscribers about it.
Post these images on Instagram and invite them to click on the link in your bio. When they click, they’ll be taken to your landing page, where they may join your mailing list.
The Differences Between Personal and Business Accounts
You’re ready to get serious about your Instagram strategy. Thanks to the tips above, you know just what to do to start building your mailing list. However, one final issue may be confusing you – you’re not sure whether you need a personal or business account on Instagram. If you’re not sure, here’s what you should know.
An Instagram personal account is perfect if you’re just hanging out sharing funny photos of your cat or posting pictures of your travel adventures. Your only reason for publishing your images is to connect with friends and family or share a glimpse of your world.
If you happen to be a brand, you’re selling a product or service, then you need a business account. Business accounts on Instagram get special perks including in-depth statistics. You’ll be able to see a breakdown of your followers by age, country, and even interests.
Another advantage of a business account is that you can schedule your posts using third-party software. If you plan to post to Instagram throughout the day, then you don’t want to be chained to your phone, constantly updating.
You’ll get access to advertising features, too. That means if you want to sponsor a post or create an ad for an upcoming sale, you’ll be able to do that easily through Facebook’s ad manager.
Another advantage is that Instagram allows business accounts to add a brief “call-to-action” (CTA) button to their profiles. That means that you could include a “call us” button along with your phone number or a “visit our website” button along with your site address. These buttons make it easy for users to connect with your brand when they’re ready to make a purchase.
Some people have complained that they see less engagement when they switched to a business profile. While this was an issue in the past, Instagram recently changed their algorithms. Instead of seeing posts in chronological order with the most recent ones at the top of the feed, users will see their favorite accounts and brands at the top.
The new Instagram algorithm ranks how popular your account is with a follower based on how frequently they like, comment, or DM your brand. That means as long as you keep your engagement rate high, you have every chance of appearing at the top of your followers’ news feed. This drives even more growth, creating a wonderful cycle of continued interaction.
Let’s Set Up a Business Profile from Scratch
If you don’t have an Instagram account yet but you want one, here’s how to set up one up from scratch. Keep in mind that these instructions were created using the desktop version although the steps will be similar if you use a smart device to do it.
Step #1: Go to Instagram
On a desktop device, you’ll simply navigation to the Instagram website. If you’re using a smart phone, you’ll want to open the app store and search for the Instagram application.
Step #2: Enter Your Info
You can use your Facebook account to sign up for Instagram. However, you’ll have more customization options if you choose to do it yourself.
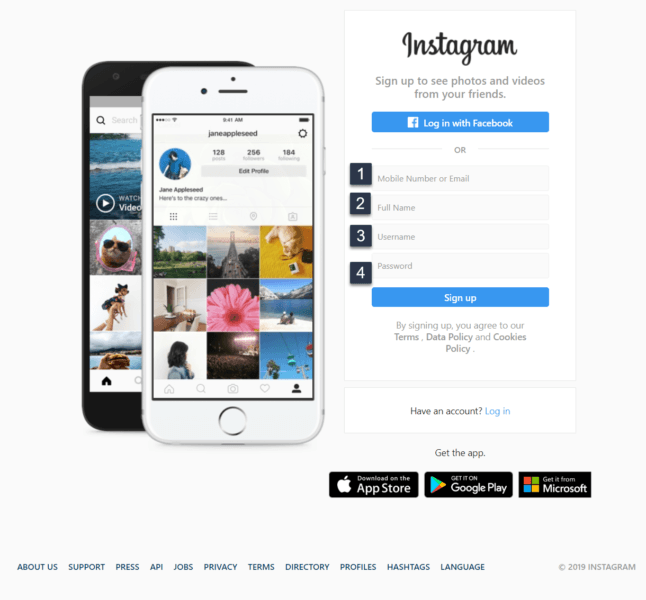
You’ll want to fill in four boxes in this section. They are your mobile address or email. You can use whichever one you prefer. Since this will be a business account, use an address or phone number associated with your business.
Next, enter your full name. If you’ll be posting as your brand name, then enter that here. However, if you’re a real person that also happens to be a brand (e.g. Sarah Wilcox) then you’ll want to enter Sarah Wilcox in the name area.
Now, it’s time to choose your username. It’s important to understand that your username can be changed later and that it can be different from your name. If you’re Sarah Wilcox but your brand is Travel Adventures for 20 Somethings. Then your username might be @traveladventuresin20s.
The final step is to enter your password. You should choose a strong password that you aren’t using anywhere else online and have never used before. This helps to decrease the chances of your account be hacked later due to password issues. When you’re done, click the bright “Sign Up” button.
Step #3: Follow Some Accounts
Next, Instagram will present you with a list of accounts to follow. These are usually celebrities or recognizable brands. Click a few to follow for now (you can unfollow later).
The reason you want to do this is that spammers sometimes sign up and don’t follow any accounts. You don’t want your new account to be mistaken for a spam one so just follow four or five accounts.
Once you’ve chosen a few accounts, scroll to the bottom of the page and click “Get Started.”
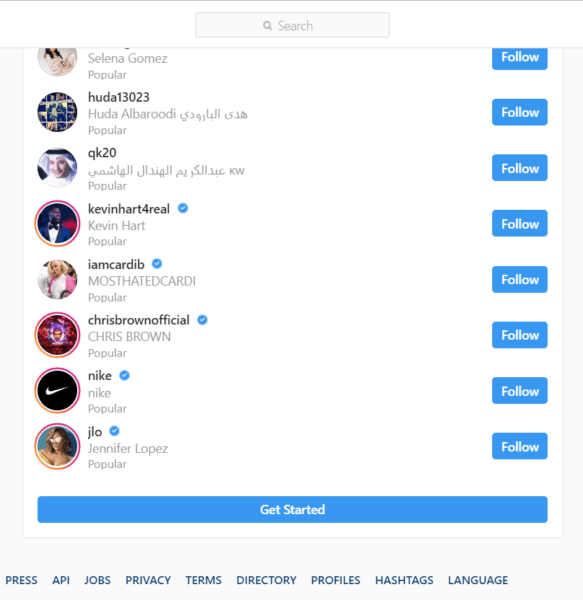
Step #4: Navigate to Your Profile
Now you’ll be taken to your news feed where you can see posts from the accounts you followed as well as several suggestions about what to do next on Instagram. The smartest idea is to go immediately to your profile. You can do that by clicking on your username in the right column.
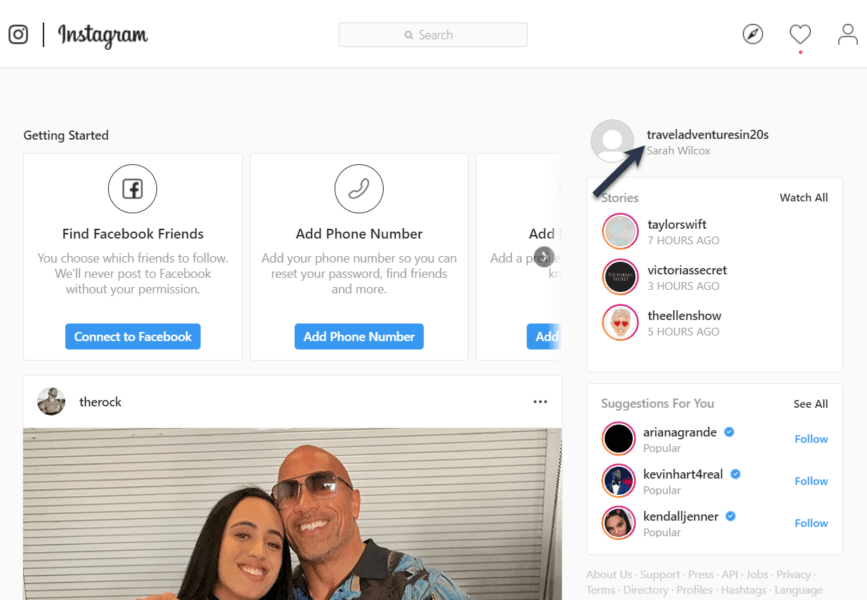
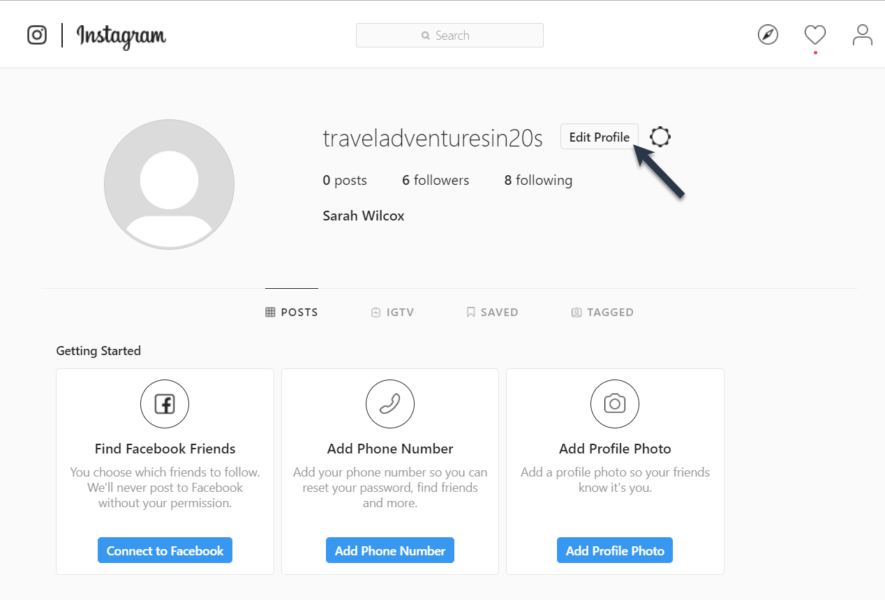
Step #5: Edit Your Profile
The page you’ll arrive at looks plain. It’s your profile and we’ll fill out right away. To get started, you’ll need to click on the “Edit Profile” button.
Step #6: Upload Your Profile Photo
The first thing people will see about you on Instagram is your profile photo so let’s begin there. You’ll want to upload a photo that’s PNG or JPG. Remember, this photo will represent you and your brand.
If your brand name is personal (e.g. Sarah Wilcox) then you should opt for a photo of your smiling face. However, if you went with a brand name, then you’ll want to use a copy of your logo.
When you have a photo in mind, click “Change Profile Photo,” and then select a photo from your device.
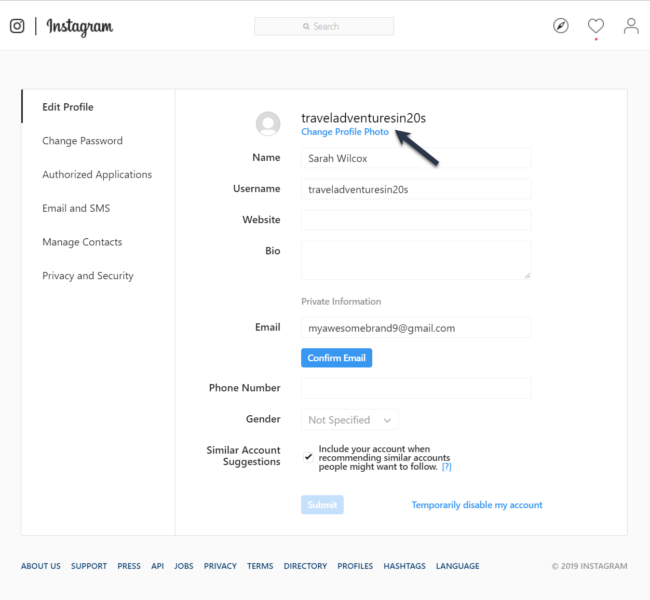
Step #7: Add the Rest of Your Information
Once your photo is uploaded, you’ll see a preview of it in a little circle on the side and you can begin completing your profile. If you need to change your name or username on the site, you can do that now.
You’ll also want to add your website and bio too. You can include your gender and phone number as well. Just be sure to use your business phone if you include a number here. That way if you use the “call us” CTA button later, your official phone will ring (not your private cell).
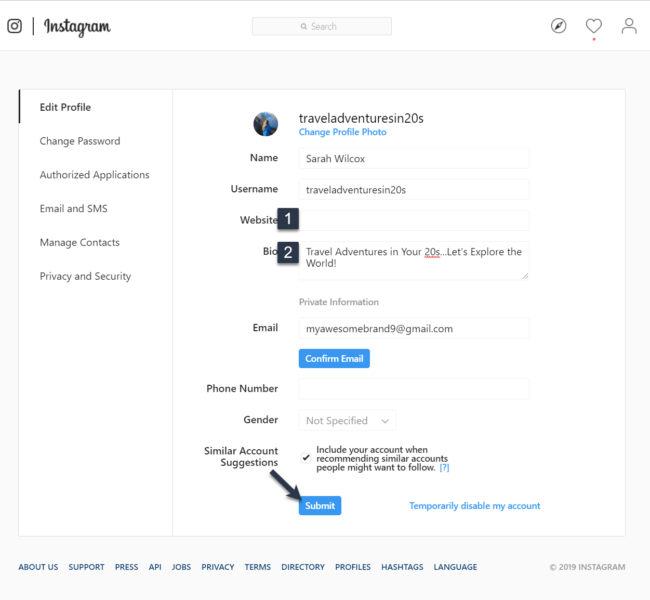
Your Instagram profile is officially set up! You can kick back and take it easy now.
Transfer Your Personal Instagram Account to a Business One
You’ve been using Instagram for ages and you didn’t realize there was a business option. The good news is that you’re not stuck with your personal account. Instagram offers a method for converting your personal account to a business one so you don’t lose any of your followers, likes, or posts. Here’s what to do…
Note: You will need a Facebook Page for your brand in order to transfer your personal Instagram account to a business one. If you don’t have one, set up a Facebook page before you complete this tutorial.
Step 1: Login to Instagram
It’s important to understand that you can only convert a personal IG account to a business one on your smart phone or other device. That’s because you need to access the app to do it.
If you don’t have the Instagram app, open the app store and search for Instagram. Download the official app and you’re ready to go! Now that you have the app, login to your Instagram account like normal:
Step 2: Go to Your Profile
After logging in, you’ll see a bunch of photos. This is your news feed (like what you see on other social media websites and apps). In the bottom right corner, you’ll spot an avatar. Click on that to be taken to your profile.
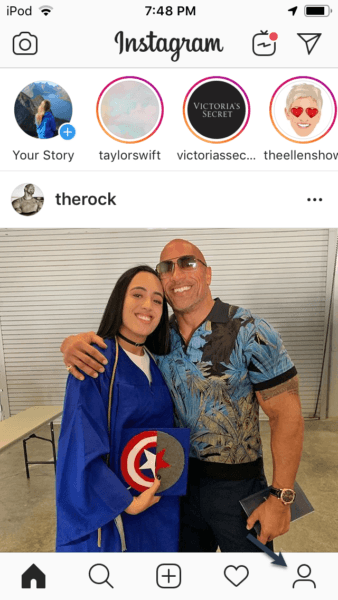
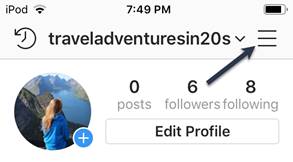
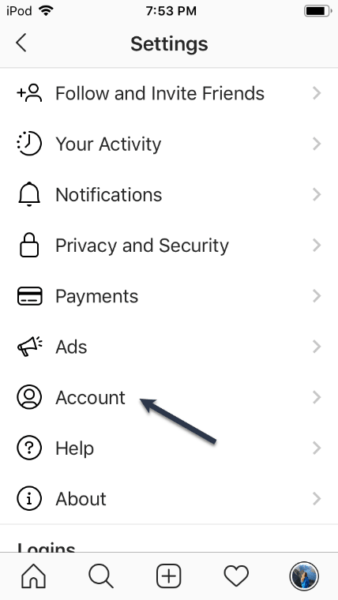
Step 3 & 4: Tap the Lines then Settings
The lines in the top right corner are a “hamburger” menu, named for the stacked shape.
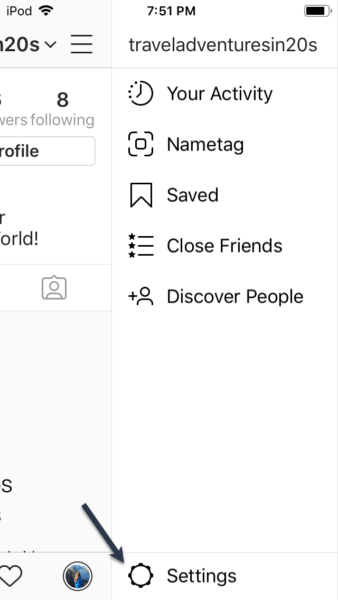
When you click it, you’ll see a few options pop out. You want “settings” at the bottom.
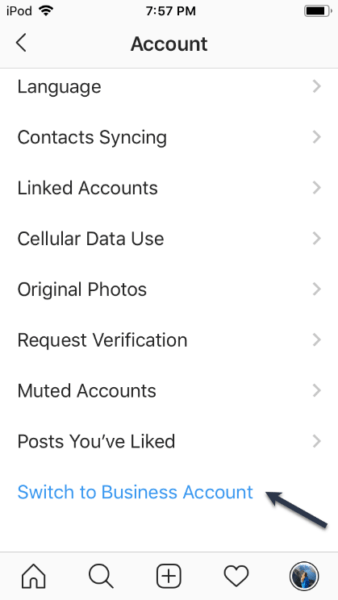
Step 5 & 6: Tap Account then Switch to Business Account
This will take you to your account settings.
The “Switch to Business Account” option is usually at the bottom of the screen so you’ll have to swipe down to see it.
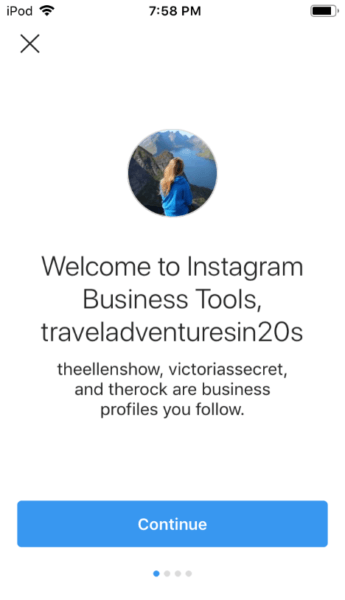
Step 7: Click Continue
Now, Instagram is welcoming you to your new business account and helping you get it set up properly. Take your time through this section and make sure you understand your options before you proceed.
When you’re ready to continue, click on the blue button labeled ‘Continue.’ You may need to hit the continue button several times.
Step 8 & 9: Choose a Page then Continue
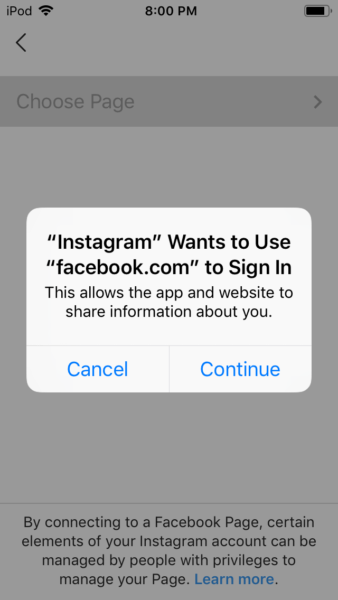
In order to serve their customers better, Instagram likes to link your profile to a Facebook business page. This ensures that you get the best of both worlds—advertising and insights from Facebook as well as Instagram.
Tap ‘Choose a Page’.
Then tap ‘Continue’ when Facebook asks to connect to your account.
Step 10: Login to Facebook
Use the same account where you have registered your Facebook page for your brand.
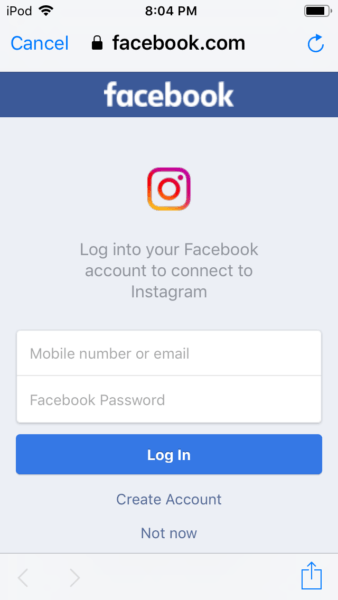
Step 11: Tap ‘Continue As…’
Now Instagram would like to verify access to your account. Simply tap ‘Continue As (Your Name)’.
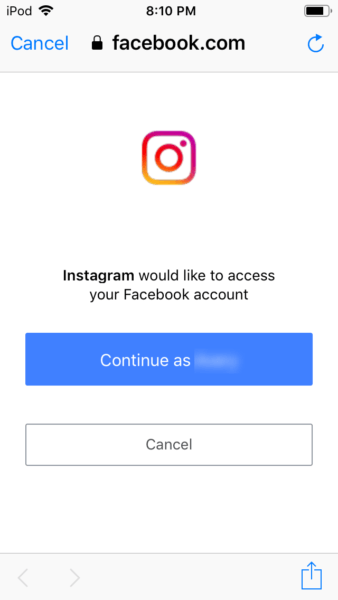
Step 12: Select Your Facebook Page
If you already have multiple Facebook pages, you may be asked which page you want to link. Choose the one that matches your brand.
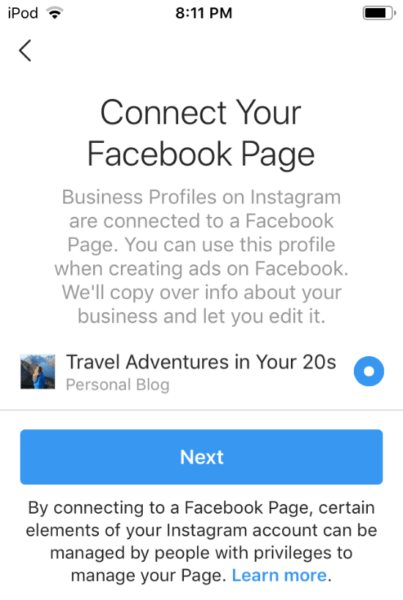
Step 13: Review Your Contact Information
If your contact information is correct, tap the blue ‘Done’ button.
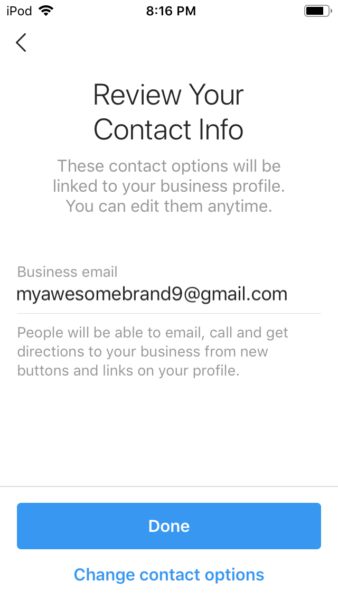
Step 14: Go to Profile
You’ll see a notification from Instagram welcoming you to your business profile, tap ‘Go to Profile’ to see your new business account.
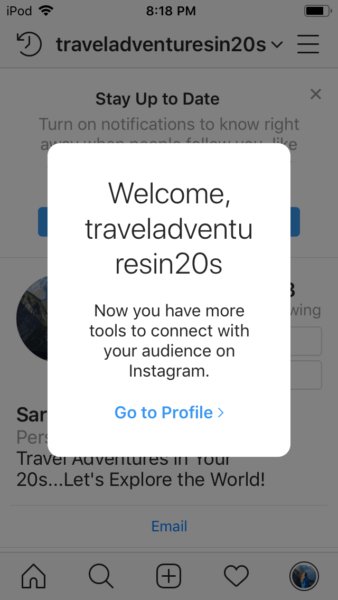
If everything is set up correctly, you’ll spot a ‘Promotions’ button on your account now. This is how you can manage advertisements.
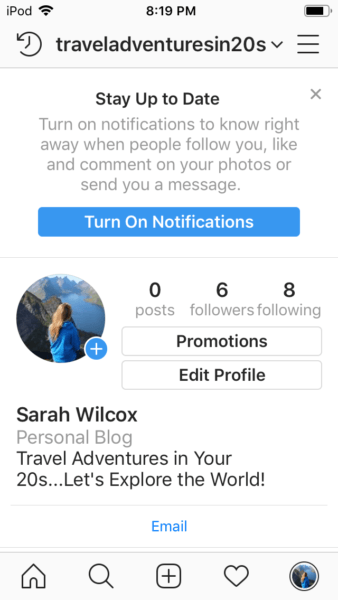
Your Instagram profile is officially a business account. You can take a deep breath and relax now that it’s set up!
How to Optimize Your Instagram Business Profile
Once your Instagram profile is set up correctly, as a business, there are still things you need to do. You want everything to be optimized for maximum exposure. Here’s what you should consider doing.
Use Tracking
Instagram allows brands to share one link in their profile. If your goal is to build your mailing list, then you’ll want this link to be your landing page. However, don’t just post your naked link on Instagram.
Instead, use a shortening service like Bit.ly to cloak your link. By doing this, you’ll be able to see stats on how many people are visiting your site based on your Instagram posts. That means you’ll have a better idea of your ROI for this social network.
Make Your Site Mobile Friendly
If you haven’t already, make sure your website (including that landing page!) is optimized for mobile users. Since the majority of Instagram followers will be browsing from a smart phone, they’ll go to your site on a mobile device. You don’t want to lose them because your site was slow or too difficult to navigate.
Experiment with browsing your site on various devices to see what how it functions and what it looks like. If you don’t have access to dozens of mobile platforms, then try using a website like Responsive Design Checker to view your site as if you were seeing it on different devices.
Match Your Other Posts
Instead of flinging images onto Instagram and hoping your followers like them, think about your other content on the web. How can you use this social network to promote what you’re already creating?
Smart brands consider what theme they’re promoting that week or month and make sure all of their social media content (including Instagram images) match. This creates a uniform experience for followers and fans of the company.
Delegate Notifications
If you don’t have time to manage your Instagram notifications, delegate this task to someone else. You can hire a social media manager to respond for you or you could use an intern who’s been trained on how to handle the most common customer issues.
The reason you want to do this is that many customers use social media now when they need support from your brand. Most consumers expect you to respond within the hour or they’ll check out your competitors. That means you always want someone keeping an eye on your notifications.
Apply for the Blue Checkmark
When you’ve been browsing on Instagram, you’ve probably noticed that some users have a blue checkmark beside their username. This indicates the user has been officially verified as the celebrity or brand by Instagram. It’s a way of gaining instant authority in the eyes of your followers.
However, blue checkmarks aren’t given out to just anyone. You have to apply to be approved and it helps if your brand is global or if you have newspaper clippings—e.g. you’ve been featured or interviewed in a major publication.
Include Emojis
It might sound silly but emojis are popular on Instagram. In fact, users expect to see them in your bio and in your posts. You don’t have to go crazy and include 1,500+ emojis every time you post.
Aim to include 1-3 within each post and a couple in your bio. If you’re using a desktop computer on Instagram, you can navigate to a website like EmojiPedia.org to copy and paste emojis as you work.
The Best Practices for Posting on Instagram
Like all social media networks, there are certain best practices you’ll want to follow. When you implement these ideas, you’re more likely to grow your following, develop your brand awareness, and sell more products. Here’s what you should be doing…
Use Hashtags
If you’re not familiar with them, hashtags look like this: #sunset or #bikini. On some networks such as Twitter and Instagram, hashtags are a vital component of each new post that you make. However, on some networks like Facebook and Pinterest, your hashtags matter a lot less.
The reason that hashtags are important on Instagram and Twitter is because hashtags are how followers discover new content. That means someone might be interested in learning about journaling, so they look up #bulletjournal for ideas and inspiration.
The good news is you don’t have to figure out the hashtags you should be using on your own. There are plenty of apps and websites to help you with this task. One of the most popular ones is All Hashtag.
Just type in the subject that your post is about, and you’ll have a few dozen ideas generated for you. Of course, you’ll want to keep in mind that Instagram doesn’t like more than 20 hashtags. The average number of hashtags that most brands find effective is around ten, so try to focus in on a few key ones that are likely to get you the most traction.
Post at the Right Times
You can post on Instagram at any time and you’ll probably see some engagement. However, if you want the most engagement then you need to be posting at optimum times. One of the best times to post is early in the morning around 5-6 am during the week. This allows your post to engage with people who are just waking up and reaching for their smart device.
You might also want to post in the middle of the day or early afternoon (think 11am-1pm). This is when many people go on lunch break so they’re likely to kick back and pull out their phone for a few minutes of Instagram scrolling.
Some brands find it helpful to post on weekends. If you do that, post later in the morning to reach a wider audience.
You may not see as much engagement on Saturday and Sunday so if you have an exciting sale or big news to share about your brand, you’re better of saving it until the middle of the week when followers are more likely to be using the app.
Be Smart with Your Posts
Instagram posts with longer captions do the best. A simple way to lengthen your description is to start by describing the image. This also makes the image accessible for those with visual issues. So for example, you might say: Young redheaded woman poses for a photo by the pool in a teal two-piece bikini.
Then launch into your post. Try to make your actual post 2-3 paragraphs in length and fill it with valuable content such as tips and advice. If you run a brand that caters to digital photographers, then you might share tips on how to get the perfect sunset shot or how to capture an image of a happy child who’s in motion.
Once you’ve written your description, now use your hashtags. Don’t use the same hashtags in the same order every time. That causes you to look spammy and makes it more likely that Instagram will mistakenly remove your account.
In your image caption, be sure to use emojis. Emojis boost the engagement rate of your photo. Be sure to use relevant emojis. Some emojis now have double meanings.
For example, the peach symbol is sometimes used to indicate a butt. This is helpful to know if you have an audience base that is conservative and may consider this emoji offensive. However, if your brand is a lingerie company then the emoji might be perfect to use when showing off your latest collection of clothing.
Considering Boosting Your Post
When you upload a photo to Instagram and notice it’s getting a lot of engagement, you may want to boost that post. If you’re not familiar with it, boosting a post is a form of advertising.
You pay the social networking company to promote that post to even more users. The cool thing about boosting a post is that you can choose the audience you want to view it. This means if your demographic is single women aged 25-29 living in the US, you can target them specifically.
The minimum amount of time that you can boost a post is for seven days. That’s because it can take a couple of days to get more engagement. As your interaction grows, your post will become more popular resulting in more people seeing it.
Understanding Instagram’s Video Formats
Instagram isn’t just great for sharing your brand’s photos. It’s also a wonderful way to share video and grow your brand awareness. However, if you’re new to Instagram or haven’t been paying attention to the platform, you might be confused by all the different video options. Here are the four key types of videos and a rundown of what you should know.
Video Posts
If you capture something cool and want to share it on Instagram, you can do that but your video will be limited to 60 seconds. You’ll want to upload to the social network the same way you do your other posts. That means taking time to create a compelling caption, adding hashtags, and using one or two relevant emojis.
Instagram Stories
Stories are quick videos that are limited to 15 seconds. However, you don’t have to record video to create a story. Some brands use several photos that they upload at once, creating a simple slideshow. The final product feels like a video but it’s actually just a collection of images.
Instagram Live
Live is a feature of stories. It’s a wonderful way to connect with your followers in the moment. Let’s say your brand is focused on makeup and beauty. If you’re at a body positive conference, then you might want to go live and talk about what you’re seeing and experiencing there.
The fun of live is that it allows you to bring your viewers into your experience. For even better exposure, use Live videos, which can be up to an hour in length. This means you have plenty of time to chat with your viewers and answer their questions.
Instagram TV
Instagram TV is similar to Live in that you can record for up to 60 minutes. Instead of airing your content as it happens, you have the space to record it and publish it at your convenience.
This type of video is cool if you want to publish an in-depth tutorial, share your thoughts on a weighty topic, or inspire your audience with an interview of an industry expert. It’s more polished and professional than Live. When followers watch an Instagram TV video, they expect better quality and they typically want to watch longer content. This means that you’ll want to record videos that are 20+ minutes.
Don’t Forget Dimensions
When it comes to Instagram video, you’ll want to keep the platforms expected dimensions in mind. Currently, there are two sizes and you’ll want to pick which one will work best for your needs.
The first size is 1080 pixels wide by 608 pixels tall. The aspect ratio is roughly 1.91:1. At this size, your video will be in landscape orientation, meaning your shot is wide. Landscape is great when you have a lot of movement you want to capture in your video. If you were doing a cooking tutorial or recording a baseball game, this is the size you’d want.
The second size is 1080 pixels wide by 1350 pixels tall. The aspect ration is about 4:5. At this size, your video will be in portrait orientation, meaning your shot is narrow. Portrait is perfect when you’re just talking with the camera and not planning to move around too much. It also creates a more intimate feel than landscape does. It draws followers in and gives them the feeling they’re casually chatting with a friend over coffee.
Coming Up with Content Ideas
No matter how prolific a content creator you are, you can still wake up one day to discover you have no new ideas. Don’t panic or freak out yet. Your creativity is just lull and you can pull it out again. In the meantime, try publishing one of these posts to your Instagram account…
A Quote That Inspires You.
This doesn’t have to be anything life changing here. Just choose a quote that motivates or energizes you. You can find collections of quotes on just about every topic on Quote Garden and Brainy Quote.
A Behind-the-Scenes Photo or Video.
Show your followers what life is really like behind-the-scenes of your brand. This might be a selfie of you at your desk, typing away if you’re a content creator or if you’re a fitness blogger, it might look like pictures from your last food prep day. Sharing your ordinary moments on Instagram makes you look approachable and accessible.
A Book You’re Reading.
Choose a book you’re reading and post about it. This book might be relevant to your niche already but if it’s not, try to find a way to tie it in. For example, if you are in the health industry and you’re reading a book about sailing, you might talk about the importance of taking a vacation.
An Old Conference You Attended.
Remember that amazing seminar you participated in last spring? Dig up that old photo and post it on Instagram. Be sure to tag anyone you’re posing with so you can re-connect with them.
A Shout Out to Someone Else.
Choose a colleague or friend you’d like to promote. Post a picture of them along with an encouraging caption about why they’re a wonderful person. If your account is business-related, you can post about another brand instead. Be sure to tag the other person so they see your comment!
When you’re feeling bored and uncreative, it can be helpful to go and look through the Instagram accounts of people that inspire you. Pay attention to their aesthetics, captions, and emojis. You never know what might catch your eye!
Tips for Batching Your Instagram Posts
You don’t want to spend your life tied to your Instagram account. Instead of enjoying that delicious cup of coffee or hanging out with a colleague, you’re worried about how to stage the photo so it looks good on Instagram. To avoid this, it’s smart to think ahead and batch your social media photos. Here are three quick tips to help…
Know your topics.
Try to list 4-5 things you like to post pictures of. One entrepreneur likes to publish photos of her favorite coffee mugs (she has dozens), her podcast guests, her three-legged cat, and her latest art creation. By creating a mix, she gets to choose which elements of her life and her business to share with her followers.
Embrace the ordinary.
Document your life and business as you go. If you’re drinking from a beloved mug this morning, snap a photo. Is your dog is doing something silly? Record it. If you’re having an amazing brainstorming session with your coach, grab a selfie. Then when it’s time to post later, you have a big supply of photos to pull from.
Use a planner.
When it comes time to schedule your Instagram content, use a scheduling tool that will show you a feed preview. Then you can adjust your grid if you notice you’re using too much of one color or you have three photos that look similar right next to each other. Two apps that let you preview your Instagram grid are Later and Plan.
Understanding Your Instagram Insights
Like Facebook allows you to view analytics (called Insights) for your business page, Instagram does the same thing for your business profile. To access these analytics, you’ll need to open the app and sign into your business account.
Tap the menu, then tap ‘Insights’. The social media platform will bring up your most recent posts. You can click on a specific one to learn more such as how many likes it received as well as how many comments, direct messages, and bookmarks it inspired.
Along with your content, you can also view the activity on your account. This is the number of people that visited your profile or that clicked on your profile. Perhaps they tapped on your bio or used your CTA button to contact you.
You can also view your reach number as well as the impressions. Your reach is the number of unique visitors who saw your posts. The impressions are the number of times users saw your post or story. This number is typically higher than your reach. That’s because the same user could flick past your post 5-6 times. Each of their views would be counted as an “impression.”
When you’re done viewing your activity, you’ll want to check out your audience. Instagram will show you the exact number of followers you have and break it down into useful statistics.
Country Breakdown
It starts by identifying the countries where your content is most popular, but you can go deeper than that and view the cities, too. The location may not seem that important but think about this: if you notice most of your users are in the UK and Canada, you may want to opt to use the word “color” instead of “color” in future posts.
Along with the location of your most active followers, you’ll also discover the median age of your fans. You can further divide it by gender. So, for example, you might find out that your channel is very popular with men who are 25-34 when you expected to have a predominantly female audience.
At the bottom of your Insights, you’ll see an area marked “Followers.” This is Instagram showing you what days of the week and times your people are most active on the app. This can be useful information as you’ll know when to schedule your posts for the maximum engagement.
Be sure to view your Followers area, looking at the most active times during different days. Your followers might be most active at 6pm on Sundays while on Mondays, they’re likely to be browsing around 3pm.
Embracing Instagram
Keep in mind that Instagram is constantly evolving as a platform, so you’ll need to experiment to see what works. The more you use the social network, the easier it will be to spot trends, grow your following, and create more exposure for your brand.
Happy Gramming!

